How to Send Money from Australia to Nepal
There are millions of ways to send money from Australia to Nepal. With more and more students heading to and settling in this part of the world, they are looking for ways to transfer money from Australia to Nepal. The five important things that should be kept in mind while remitting money across different currencies is the exchange rate, applicable fees, reliability, the speed of transfer and legality. Some money transfers might offer excellent Australian Dollar (AUD) to Nepalese Rupees (NPR) rates but they might not be the legal way to send money to Nepal. Such money transfers might not be reliable and you are at risk every time you transfer money via such methods. When moving money, choosing the legal way authorized by Nepal Rastra Bank should be picked. Only when we use such registered companies to send money back home, we will contribute into an important part of Nepal’s economy i.e. remittance.
*Click Here to Join TransferWise using my Affiliate Link and get a Fee-Free First Transfer.
Now, we can send SWIFT transfers using our bank accounts like Commonwealth Bank but the fees that they have per transaction might not be suitable for everyone. The most reliable one that I have found is TransferWise. It is cheap (in fees), provides good exchange rate (AUD to NPR) and is quick. Money is deposited in Nepalese Bank Accounts within a day or two. The interface that they have is also really good. They have a website or an app for Android or Apple devices. They are pretty straightforward with the transaction and the interface is really commendable.
The Process of Sending Money to Nepal using TransferWise
The process is simple as well. All you do is open an account and verify it which doesn’t take long. Then you set up the transfer in a few number of quick steps.
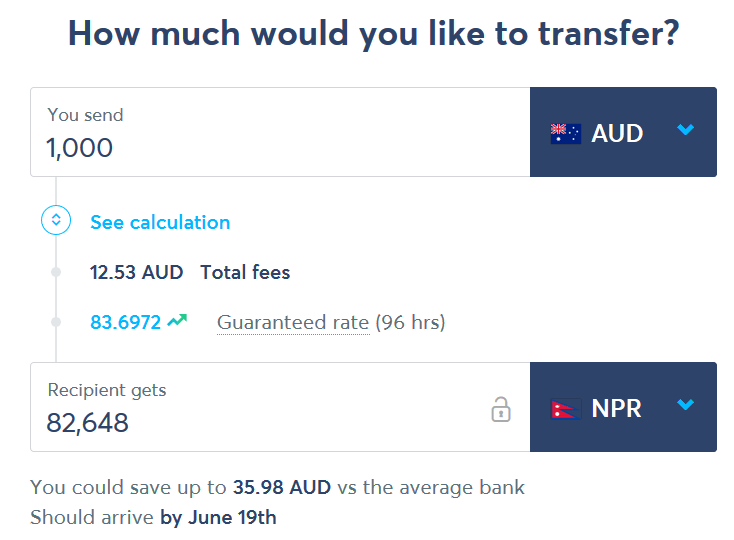
- Specify the Australian Dollar amount to transfer. Fees and the sum in Nepalese Rupees is calculated instantly.
- Give your details (if not done previously).
- Provide the recipient details (name/bank account).
- Select a reason for transfer.
- Review the amount and fees.
- Confirm how you’d like to pay.
- Make the payment.
- Notify them that you have paid.
Transfer will complete as soon as possible. It is really reliable as TransferWise is a global provider of remittance.
Step 1- Amount to Send

On the transaction screen you input the amount that you want to send (source currency and destination currency). AUD to NPR in our case. The fees and exchange rates are displayed on the page itself. The rate is quite good and fee is low. The exchange rate is locked for 96 hours.
Step 2- Your Details
Specify your details in the second stage. This stage is just done once. If you have provided your details before, this step will be skipped automatically.
Step 3- Recipient Details
Then, you specify the recipient with their email, full name, country, city, address, postal code, bank name and bank account number. Ensure that you enter the right details. You can choose the bank name from the drop-down. All supported banks of Nepal are listed. These details can also be saved for future transactions.
Step 4- Reason for Transfer
Once the recipient is specified, select a reason for your transfer. Reasons can be sending money to home to family, cash gift. There are plenty of reasons to choose from as long as it is a legit transaction that you are making.
Step 5- Review Details
On the fourth screen, you get to review all the details. Check for mistakes and make any changes if necessary. You will get the straightforward details of how much you are sending, what the fees are and how much the recipient gets. In this step, you can also a reference for the receiver if you want.
Step 6- Choose Payment Method
Once you confirm your details, you need to fund your transaction. This means, you are going to transfer the money in AUD to TransferWise so that they can send it to your family. You can make a bank transfer, pay to a PayID, send POLi payments, use a debit card or credit card. The fees for bank transfer, PayID, POLi are basically the same. Debit card attracts higher fees and a credit card has the highest fee. So, I would use the first three methods to make the transfer.
Step 7- Making the Payment
Once you choose the payment method and click continue to payment, you can transfer the money to TransferWise. They will give you the details to send the money to. For example- If you choose PayID, you will be given a PayID email address and a reference number. Make sure to send the money to the PayID with the reference number copied exactly. Only then will the payment be accepted. Otherwise, it will be rejected.
Step 8- Confirm the Payment
Once you make the payment, they will take a short amount of time. I sent to a PayID and it took them less than an hour to recognize the payment. Once the payment has been processed, they will begin the transfer. It will not take that long. For me it showed 20 hours. My family back home received the amount the next working day.
*Click Here to Join TransferWise using my Affiliate Link and get a Fee-Free First Transfer.
*I will get paid a referral bonus if qualifying transfers are made.
Comments (